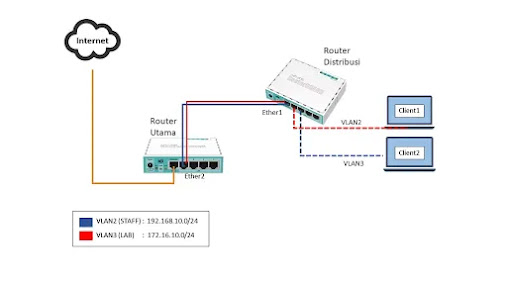
KONFIGURASI ROUTER R1
1. Hubungkan Mikrotik R1 ke Laptop/ Komputer yang akan digunakan untuk mengkonfigurasi.
2. Jalankan Aplikasi Winbox --> Neighbors --> Refress hingga muncul router --> Klik Mac Address --> Isi Login: admin/ Password: kosong --> Connect
3. New terminal --> ketik: “system reset” --> Enter -->tekan tombol “y” pada keyboard, Router akan tereset--> tunggu beberapa saat hingga indicator lampu router menyala kembali.
4. Reconnect -->“remove configuration”
5. Reconnect --> system --> identity --> ganti nama: R1 --> Apply --> Ok
6. Interfaces --> ubah nama interfaces
- Ether1 = ether1-internet --> Apply -->Ok
- Ether2 = ether2-vlan --> Apply -->Ok
7. Interfaces --> VLAN --> +
- Name = Lab Admin
- Vlan ID = 10
- Interface = ether2-vlan
8. Interfaces --> VLAN --> +
- Name = Lab Jaringan
- Vlan ID = 20
- Interface = ether2-vlan
9. Interfaces --> Pilih Wlan1 --> klik kanan --> Enable
10. Klik 2X Wlan 1 --> Klik Tab Wireless
- Mode = ap bridge
- Band = 2Ghz-B/G/N
- SSID = Nama Hotspot --> Apply --> Ok
11. IP --> Address --> +
- Address= 10.10.10.X/24 (X diganti dengan No Urut absen masing-masing)
- Interface = ether1-internet --> Apply --> Ok
12. IP --> Address --> +
- Address = 192.168.10.1/28
- Interface = Lab Admin --> Apply --> Ok
13. IP --> Address --> +
- Address = 192.168.20.1/28
- Interface = Lab Jaringan --> Apply --> Ok
14. IP --> Address --> +
- Address = 192.168.30.1/24
- Interface = wlan1 --> Apply --> Ok
15. IP --> dhcp Server --> DHCP Setup
- Pilih Interface = Lab Admin --> Next
- DNS Server = 8.8.8.8, 1.1.1.1
- Next sampai complete
- Klik 2 kali dhcp1 --> Cheklist “Add ARP For Leases” --> Apply --> Ok
16. IP --> dhcp Server --> DHCP Setup
- Pilih Interface = Lab Jaringan --> Next
- DNS Server = 8.8.8.8, 1.1.1.1
- Next sampai complete
- Klik 2 kali dhcp1 --> Cheklist “Add ARP For Leases” --> Apply --> Ok
17. IP --> hotspot -->
- Tab Servers --> Hotspot Setup
• Hotspot Interface= wlan1 --> Next
• DNS Server = 8.8.8.8, 1.1.1.1
• DNS Name = Nama.net (Nama disesuaikan dengan nama siswa)
• Next sampai complete
- Tab Server Profile
• Klik 2X Server hsprof1
• Pada Tab Login checklist: HTTP PAP, HTTP CHAP, HTTPS --> Apply --> Ok
- Tab Users --> +
• Server = hotspot1
• Name = tamu
• Password = guest
• Apply --> ok
- Tab User Profiles --> default
• Address poll = hs-pool
• Rate limit (rx/tx) = 1m/1m
18. IP --> DNS
- Servers = 8.8.8.8, 1.1.1.1
- Cheklist “Allow Remote Request”--> Apply --> Ok
19. IP --> Firewall --> NAT --> +
- Tab General:
• Out Interface: ether1-internet --> Apply
- Tab Action
• Action: Masquerade --> Apply --> Ok
20. IP --> routes --> +
- Gateway = 10.10.10.254
- Apply --> Ok
21. System --> Reboot --> Yes
KONFIGURASI ROUTER R2
22. Hubungkan Mikrotik R2 ke Laptop/ Komputer yang akan digunakan untuk mengkonfigurasi.
23. Jalankan Aplikasi Winbox --> Neighbors --> Refress hingga muncul router --> Klik Mac Address --> Isi Login: admin/ Password: kosong --> Connect
24. New terminal --> ketik: “system reset” --> Enter -->tekan tombol “y” pada keyboard, Router akan tereset--> tunggu beberapa saat hingga indicator lampu router menyala kembali.
25. Reconnect -->“remove configuration”
26. Reconnect --> system --> identity --> ganti nama: R2 --> Apply --> Ok
27. Interfaces --> ubah nama interfaces
- Ether1
• Name= ether1-trunk --> Apply -->Ok
- Ether2
• Name= ether2-Lab-Admin
• Master Port = ether1-trunk --> Apply -->Ok
- Ether3
• Name= ether3-Lab-Jaringan
• Master Port = ether1-trunk --> Apply -->Ok
28. Switch --> Port
- Ether1-trunk
• VLAN Mode = secure
• VLAN Header = add if missing
• Apply --> Ok
- ether2-Lab-Admin
• VLAN Mode = secure
• VLAN Header = always strip
• Default VLAN ID = 10
• Apply --> Ok
- ether2-Lab-Jaringan
• VLAN Mode = secure
• VLAN Header = always strip
• Default VLAN ID = 20
• Apply --> Ok
29. Switch --> VLAN --> +
- VLAN ID = 10
- VLAN Port = ether1-trunk, ether2-Lab-Admin
- Apply --> Ok
30. Switch --> VLAN --> +
- VLAN ID = 20
- VLAN Port = ether1-trunk, ether2-Lab-Jaringan
- Apply --> Ok
31. System --> Reboot --> Yes
PENGUJIAN KONFIGURASI
1. Hubungkan Komputer pada ether2 di Router R2, hasil:
- Ip yang didapat pada computer adalah 192.168.10.X
- Komputer bisa melakukan browsing internet.
2. Hubungkan Komputer pada ether2 di Router R2, hasil:
- Ip yang didapat pada computer adalah 192.168.20.X
- Komputer bisa melakukan browsing internet.
3. Hubungkan Komputer ke “Nama hotspot”:
- Ip yang didapat pada komputer adalah 192.168.30.X
- Buka browser --> pada URL ketik: Nama.net
(Nama disesuikan dengan DNS Name masing-masing, misal: ilham.net ).
- Pada halaman login, lakukan login dengan mengunakan user = “tamu” dan password = “guest”.
- Komputer bisa melakukan browsing internet
- Pada Router R1 user “tamu” terdaftar pada Queues.

Tidak ada komentar:
Posting Komentar